Thinking about remodeling your bathroom can bring up a lot of questions. You’re probably wondering where to even begin, how to keep the project on budget, and what the correct order of steps is to avoid expensive mistakes. Many people in the Denver area feel the same way. They worry about the disruption to their daily life and the fear that a contractor might cut corners on the important work behind the walls.
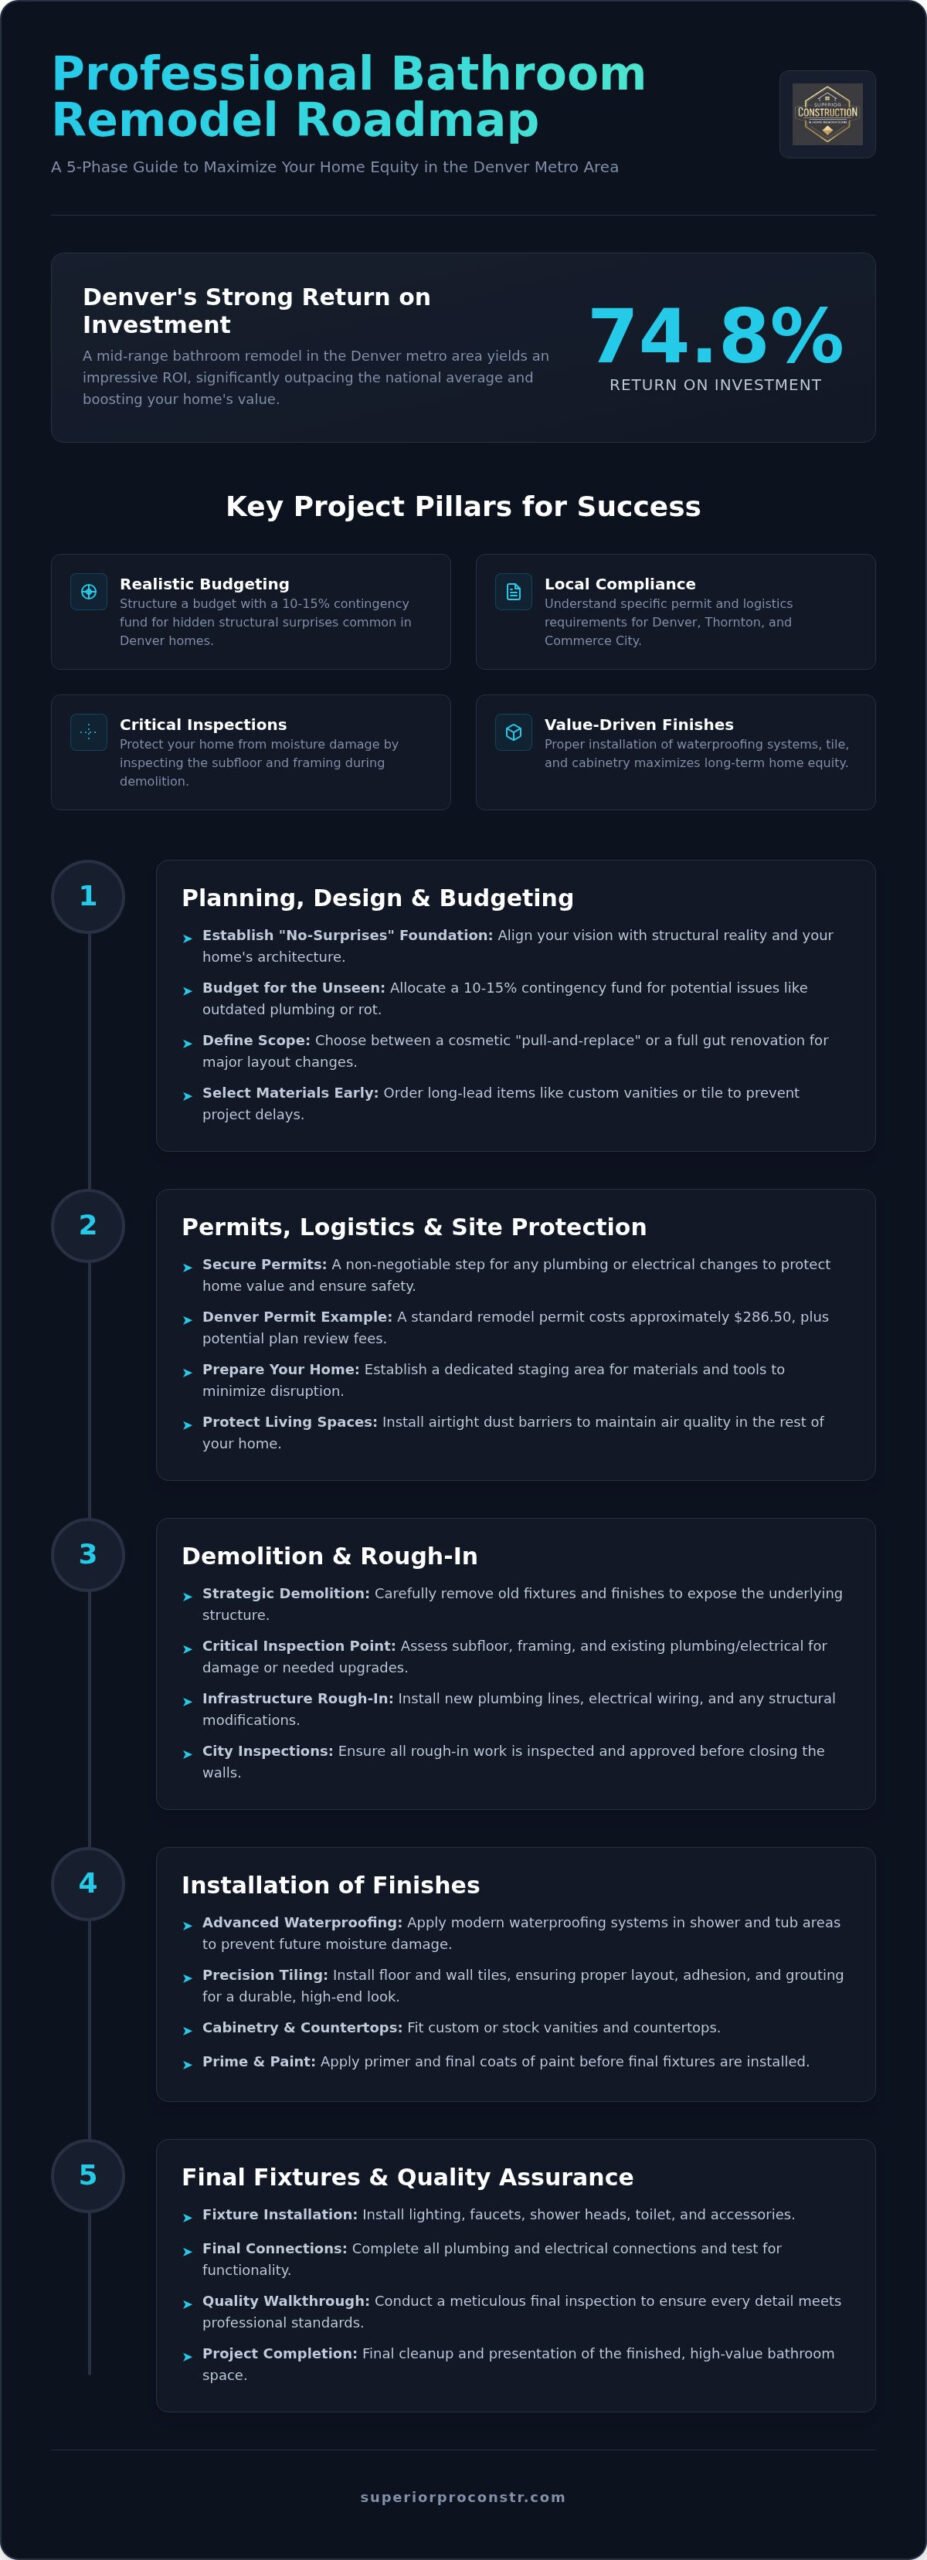
A successful bathroom remodel isn’t just about picking out new tile and paint. It’s a carefully managed construction project. The goal is to give you a clear roadmap, turning the confusion of a renovation into a predictable, step-by-step process. This guide breaks down a professional bathroom remodel into five distinct phases, showing you how we move from an initial idea to a beautiful, functional space built to last.
Table of Contents
- Phase 1: Planning, Design, and Budgeting for Long-Term Value
- Phase 2: Permits, Logistics, and Site Protection in the Denver Metro Area
- Phase 3: Demolition and the Rough-In Construction Sequence
- Phase 4: Installation of Finishes, Flooring, and Custom Cabinetry
- Phase 5: Final Fixtures, Quality Assurance, and the Superior Finish
Phase 1: Planning, Design, and Budgeting for Long-Term Value
The first and most important phase happens long before any hammers start swinging. This is where we lay the foundation for a smooth project. A well-thought-out plan is the best way to prevent surprises with your timeline and budget. We start by having a direct conversation about the numbers. It’s essential to set a realistic budget for the tile, fixtures, and labor, but also to include a 10-15% contingency fund. This extra cushion covers any unforeseen issues we might discover, like old plumbing or hidden water damage, ensuring the project stays on track without financial stress.
Next, we look at the bathroom’s layout. Are you happy with the current footprint, or do you dream of a completely new configuration? A simple “pull-and-replace” remodel is more straightforward, while moving walls or plumbing requires more extensive work. We’ll help you weigh the costs and benefits so you can make an informed decision for your home. Together, we’ll also define a design style that feels right for you and fits with the architecture of your house, ensuring the new bathroom feels like a natural extension of your home.
Defining Your Project Scope
The scope of your project is simply a list of what you want to achieve. Are you looking for a cosmetic update, or is this a full gut renovation down to the studs? We’ll help you prioritize the most important elements. For many, this means focusing on high-traffic features like durable flooring and functional cabinetry. You might also be considering specialized upgrades that make a big difference in daily comfort, such as heated floors for cold Colorado mornings or custom shower niches for streamlined storage.
One of the most common goals we hear from Denver homeowners is the desire to replace an old, bulky tub with a modern, spacious walk-in shower. A tub-to-shower conversion not only updates the look of your bathroom but also improves accessibility and can increase your home’s resale value.
Material Selection and Lead Times
Once we have a clear scope, we can move on to selecting materials. This is a crucial step that can impact your project timeline. Certain items, like custom vanities, special-order tile, or specific plumbing fixtures, can have long lead times. We identify these “long-lead” items early and get them ordered right away to prevent delays down the road.
Living in Colorado means we also have to consider our unique climate. We’ll guide you toward materials that can withstand the dry air and temperature fluctuations without warping or cracking. The key is to find the right balance between the beautiful, high-end look you want and the durable, low-maintenance performance your family needs.
Phase 2: Permits, Logistics, and Site Protection in the Denver Metro Area
With a solid plan in place, we shift our focus to the logistics of getting the work done right. This phase is all about preparation, from navigating local regulations to protecting your home from the mess of construction. A professional contractor handles these details so you don’t have to.
We start by securing the necessary permits. Depending on the scope of your project in cities like Denver, Commerce City, or Thornton, you will likely need building, plumbing, or electrical permits. We manage this entire process, from application to scheduling inspections, ensuring all work is fully compliant with local codes. We also establish a clear project timeline with our trusted trade partners, so everyone knows what to do and when.
Before any work begins, we set up a dedicated staging area for tools and materials and implement rigorous site protection. This includes laying down floor runners to protect your carpets and hardwoods and installing plastic dust barriers to contain the work area. Our goal is to minimize disruption to the rest of your home as much as possible.
Understanding Local Permit Requirements
You might wonder if you really need a permit for your project. If you’re moving plumbing, changing the electrical layout, or altering the structure of your home, a permit is non-negotiable. This isn’t just about following rules; it’s about safety and protecting your investment. Proper permits and inspections ensure the work is done to a safe, professional standard.
Furthermore, unpermitted work can create serious problems when you decide to sell your home. A home appraiser will flag it, potentially lowering your home’s value or complicating the sale. As your contractor, we handle the entire inspection schedule for your Commerce City bathroom remodeling project, coordinating with city officials to keep things moving smoothly.
Preparing Your Home for Construction
Our “no-surprises” philosophy extends to how we treat your home. We know that living through a remodel can be challenging, so we take extra steps to make it manageable. Professional dust containment systems are set up to protect the air quality in adjacent bedrooms and hallways. We create a clear and protected path from the front door to the bathroom for our team and materials.
We also believe in clear communication. Before the project starts, we’ll walk you through the workflow so you and your family know what to expect each day. This simple step helps everyone feel more comfortable and in control during the construction process.
Phase 3: Demolition and the Rough-In Construction Sequence
This is where the physical transformation begins. Unlike the chaotic demolition you see on TV, our process is controlled and methodical. We carefully remove old fixtures, tile, drywall, and flooring while protecting the structural integrity of your home and minimizing dust and debris.
The first thing we do is shut off the water and electricity to the bathroom for safety. As we remove materials, we inspect the newly exposed subfloor and wall framing for any signs of past water damage, rot, or mold. If we find anything, we address it properly before moving forward. This is a critical step that many low-bid contractors skip. Once the room is a clean slate, we can begin rebuilding its foundation with modern, reliable systems.
The Professional Demolition Process
During demolition, we work efficiently to keep the job site clean and safe. Debris is removed from your home promptly. If your remodel involves changing the layout, we correctly identify which walls are load-bearing and which are simple partitions. This ensures any structural changes are made safely and correctly, without compromising the stability of your house.
Plumbing and Electrical Rough-Ins
With the walls and floor open, we can access the “guts” of the room. This is our opportunity to update the plumbing and electrical systems to meet modern standards. We replace old, corroded pipes with new PEX or copper lines. If you’re doing a tub-to-shower conversion, we reconfigure the drain lines for proper flow. We also carefully position the new shower valve at a comfortable height for you and frame any in-shower niches you’ve requested.
On the electrical side, we run new wiring for vanity lights, exhaust fans, and any other new features. Most importantly, we upgrade all outlets to GFCI (Ground Fault Circuit Interrupter) protected outlets, which is a modern safety requirement for any area near water. This rough-in stage is where the unseen quality of your new bathroom is built.
Phase 4: Installation of Finishes, Flooring, and Custom Cabinetry
After the plumbing and electrical rough-ins are inspected and approved, we can start closing up the walls and building the beautiful bathroom you envisioned. This phase is about precision and paying close attention to the details that create a high-end finish.
The first step is installing the right substrate for your wet areas. In the shower and around the tub, we use moisture-resistant backer board and apply an advanced waterproofing system. This creates a completely sealed, watertight shell that prevents leaks and mold growth for years to come. Once the room is waterproofed, we hang and finish new drywall, applying a texture that matches the rest of your home. Then, we can begin installing the visible finishes.
Waterproofing and Substrate Preparation
A common mistake in DIY or low-quality remodels is using standard drywall in the shower. The “wet zone” of a bathroom requires much more protection. We use materials like cement board, which won’t break down if it gets wet, and then apply a liquid waterproofing membrane over the surface and seams. We also ensure the shower pan is built with a perfect, subtle slope toward the drain. This meticulous preparation is the single most important factor in a bathroom’s longevity.
Tile Work and Surface Finishes
With the foundation properly prepared, it’s time for tile. Our experienced installers lay floor and wall tile with precision, ensuring level surfaces, tight grout lines, and symmetrical layouts. If you’ve chosen a natural stone like marble or travertine, we apply the proper sealant to protect it from moisture and staining. After the tile is set and grouted, we paint the walls and ceiling, carefully coordinating the color with your vanity and other finishes to create a cohesive look. Finally, we set your new vanity and any custom cabinetry, making sure everything is level and securely installed.
Phase 5: Final Fixtures, Quality Assurance, and the Superior Finish
The final phase is where all the pieces come together and your new bathroom becomes a fully functional space. We meticulously install the final plumbing and electrical fixtures, conduct a thorough quality check, and perform a final cleanup, leaving you with a room that’s ready to enjoy.
This stage includes installing the toilet, faucets, and showerhead, as well as mounting mirrors, towel bars, and any other accessories. If your design includes a custom glass shower door, our specialists will install it to ensure a perfect fit and smooth operation. We don’t consider the job done until every single component is in place and working exactly as it should.
The Final Trim and Fixture Set
Once everything is installed, we test it all. We turn on the water and check every connection for leaks, ensuring you have strong, consistent water pressure. We test the light switches and dimmers, and we make sure the exhaust fan is running quietly and effectively. Every door and drawer on your new vanity is checked for proper alignment and smooth operation. This detailed inspection ensures there are no frustrating little issues after we leave.
The Punch List and Project Close-Out
The final step in our process is the “punch list” walkthrough. You and our project manager will walk through the finished bathroom together to create a list of any minor items that need a final touch-up, like a spot of paint or a bit of grout. We address every item on that list until you are completely satisfied.
At the end of the project, we’ll review the workmanship warranty with you and provide any maintenance instructions for your new finishes and fixtures. Our commitment to a “Superior” finish means we don’t leave until every detail is perfect and you are thrilled with your new space.
Frequently Asked Questions
How long does a typical bathroom remodel take in Denver?
A basic “pull-and-replace” bathroom remodel can take 2-3 weeks, while a more complex renovation involving layout changes and custom materials can take 4-6 weeks or longer. The timeline depends heavily on the project scope, material availability, and the permit and inspection process in your specific city.
Do I need a permit for a bathroom remodel in Commerce City?
Yes, in almost all cases. If you are moving or adding any plumbing or electrical wiring, a permit is required in Commerce City. A simple cosmetic update (like new paint and a faucet) may not require one, but it’s always best to check. A professional contractor will handle this for you.
What is the most expensive part of a bathroom renovation?
Labor is typically the largest expense. After that, the most significant costs are often the tile (both material and installation), the vanity, and any major plumbing reconfigurations, such as moving a toilet or shower drain.
Can I stay in my home during the bathroom remodeling process?
Absolutely. If it’s your only bathroom, we can work with you to set up temporary solutions. Our team takes great care to contain the work area and clean up at the end of each day to minimize the disruption to your family’s routine.
What is the difference between a tub-to-shower conversion and a full remodel?
A tub-to-shower conversion focuses specifically on removing an existing bathtub and replacing it with a walk-in shower. A full remodel is more comprehensive and can include replacing the flooring, vanity, toilet, lighting, and even changing the room’s layout.
How do I choose the right bathroom remodeling contractor near me?
Look for a licensed and insured local contractor with a strong portfolio of completed projects and positive client reviews. The best partner will communicate clearly, provide a detailed and transparent quote, and make you feel comfortable asking questions. A good relationship is key to a successful project. We invite you to learn more about our approach to bathroom remodels in Denver.
Is it worth it to relocate the toilet or shower during a remodel?
It can be. Moving fixtures can dramatically improve a bathroom’s flow and functionality, especially in a cramped or poorly designed space. However, it adds significant cost and complexity due to the extensive plumbing work required. We can help you analyze the cost versus the benefit for your specific layout.
What are the current bathroom design trends in the Denver Metro area?
We’re seeing a strong trend toward natural materials like wood-look tile and stone finishes. Homeowners are also asking for larger, spa-like showers with features like built-in benches and multiple showerheads. Floating vanities are popular for creating a sense of space, and warm, earthy tones are replacing the cool grays of the past.
If you’re ready to move from thinking to planning, we’re here to help. Schedule your free, no-pressure consultation to discuss your vision for your new bathroom. Let’s build something great together.


